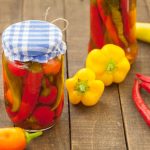
Description
Learn how easy it is to make canned chili peppers with this easy recipe. It’s the perfect way to preserve chile peppers, jalapeno peppers, and other varieties of hot peppers.
Ingredients
Scale
- 12 pounds chile peppers
- 4 tbsp canning salt
Instructions
- Wash the canning jars, lids, and bands in warm, soapy water. Rinse and place the canning lids and bands aside.
- Place the canning jar rack in the pressure canner and add 2-4 inches of water based on the manufacturer’s instructions for your pressure canner.
- Fill the canning jars half-full with hot water and place them in the canner. Maintain a simmer at 180°F for 10 minutes and keep the jars in the water until the peppers are ready.
- Add cold water to a separate large pot and let it come to a boil.
- Rinse the whole peppers, then cut a slit on the side of each pepper. This will help keep the peppers from floating when canned.
- If using tough-skinned chilis (poblano, Anaheim, or Hatch chiles), blister the skin of the chile peppers using an oven broiler at 400˚F for 6-8 minutes. Remove the stems, skins, seeds, and cores of the peppers. Leave the peppers whole, cut them into rings, or dice them into small pieces.
- If using thin-skinned peppers such as Serrano or jalapeno, blanch them in hot water for three minutes. Remove the stems, skins, seeds, and cores. Leave the small peppers whole or slice them into rings.
- Spread a dry kitchen towel on a counter. Remove the sanitized canning jars and place them on the dry towel.
- Using a ladle and canning funnel, place peppers into the canning jars. Add 1/4 teaspoon of salt to each half-pint jar and 1/2 teaspoon of salt to pint jars.
- Fill the jars with hot water, maintaining a 1-inch headspace.
- Use a bubble popper to remove any air bubbles.
- Wipe the jar rims and place the lids on the jars. Apply the screw bands and tighten until fingertip tight.
- Using a jar lifter, return the filled jars to the canner. Add the water required for your pressure canner (usually between 3 and 4 inches).
- Cover the pressure canner with a lid and let it vent steam for 10 minutes.
- Allow the pressure in the canner to build to the recommended pressure and process for 35 minutes:
Dial-Gauge Pressure Canner:
- 0-2,000ft: 11 lbs pressure
- 2,001-4,000ft: 12 lbs pressure
- 4,0001-6,000ft: 13 lbs pressure
- 6,001-8,000ft: 14 lbs pressure
Weighted-Gauge Pressure Canner:
- 0-1,000ft: 10 lbs pressure
- 1,001ft and up: 15 lbs pressure
Post Processing
- Once the processing time is over, turn off the heat and allow the pressure canner to cool down. Remove the lid once the pressure reaches zero. Allow the jars to sit in the water for five minutes.
- Spread a towel on the counter. Using a jar lifter, remove the canned peppers and place them on the dry towel. Allow the jars to sit for 12-24 hours and cool at room temperature.
- After 12 hours, remove the screw bands. Test the lids to make sure they are properly sealed and do not flex up and down.
- Label the jars with the date and store them in a cool, dry place. For best quality, use your canned peppers within 12-18 months.
Notes
- Do not alter this tested home canning recipe, as doing so may make the final product unsafe.
- Be sure to wear gloves when canning hot peppers.
- Prep Time: 15 minutes
- Canning Time: 35 minutes
- Cook Time: 20 minutes
Nutrition
- Serving Size: 1/8 cup
- Calories: 5kcal
- Sodium: 1200mg
- Fat: 0g
- Saturated Fat: 0g
- Carbohydrates: 1g
- Fiber: 0.5g
- Protein: 1g
