Description
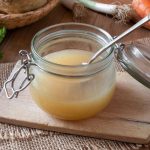
Use this vegetable broth canning recipe to make flavorful stock that is the perfect soup base for winter meals. If it’s your first time canning, follow the simple step-by-step directions below for a perfect broth!
Ingredients
Scale
- 5 to 6 medium carrots, cut into 1-inch pieces
- 6 stalks of celery, cut into 1-inch pieces
- 3 medium onions, quartered
- 2 medium red bell peppers, cut into strips
- 2 medium tomatoes, coarsely chopped
- 2 medium turnips, coarsely chopped
- 3 cloves garlic, crushed
- 3 bay leaves
- 1 teaspoon crushed thyme
- 8 peppercorns
- 7 quarts water
Instructions
- Wash your canning equipment in hot, soapy water and rinse well. Simmer clean jars in boiling water for 10 minutes or until ready for filling.
- Prepare your pressure canner. Put 2-3 inches of water inside per the manufacturer’s instructions, place a jar rack at the bottom, and set the canner to warming on the stove.
- Wash all vegetables using cool, plain running water. Rinse well. Re-rinse carrots, peel, and slice them into 1-1/4 inch wide pieces. Chop celery stalks into 1-inch sizes and onions into quarters.
- Split your red bell peppers with a sharp knife, remove the seeds, and cut them into thin strips. Coarsely chop your turnips and tomatoes.
- Combine all veggies, spices, seasonings, and water in a clean large stockpot. Set on a stove, cover the pot with a lid, and boil the mixture over high heat.
- Reduce the heat to a gentle simmer for 2 hours. Turn off the heat.
- Using a slotted spoon, remove the solids and put them in a clean, large bowl. You may discard the veggies or eat them.
- Place a chinois sieve, fine-mesh strainer, clean cheesecloth, or cotton tea towel on a clean stockpot and strain your ready veggie stock through it to ensure a clear broth.
- Ladle the hot broth into hot jars, and leave 1-inch headspace. Using a bubble popper remover tool, remove excess air bubbles.
- Wipe the jar rims with a clean paper towel, or cloth dipped in vinegar or hot water.
- Place sterilized flat lids on top of the jars, add screw bands, and adjust them until they are finger-tight.
- Carefully load the filled jars into your pressure canner using a jar lifter, lock the lid, and adjust the heat to high to boil the water and build pressure.
- Once the water reaches a rolling boil, remove the weight/pressure regulator (open the petcock) and let pressure escape steadily for 10 minutes.
- Close the petcock and wait for the pressure to increase to 10 lbs.
- On reaching the required pressure pounds, set a processing time of 30 minutes for pints or 35 minutes if using quarts.
- Once the timer beeps, turn off the heat. Allow the canner’s pressure to drop to zero before opening the lid.
- Remove the jars with a jar lifter and place them on a towel-covered counter to cool for 12-24 hours.
- Once the jars cool, check the seals. Press each lid’s center with your finger. Any lids that flex up and down when pressed didn’t seal. Put unsealed jars in the fridge and use them immediately.
- Remove screw bands, wipe sealed jars, and label them with the contents and canning date.
- Store them in a cool, clean, well-aerated place such as a pantry or cupboard away from direct sunlight.
- Prep Time: 10 minutes
- Canning Time: 35 minutes
- Cook Time: 4 hours
Nutrition
- Serving Size: 1 cup
- Calories: 80kcal
- Sugar: 2g
- Sodium: 610mg
- Fat: 1.9g
- Saturated Fat: 0.4g
- Carbohydrates: 13g
- Fiber: 1.7g
- Protein: 2.9g
- Cholesterol: 2.4mg