Description
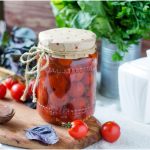
This recipe for pressure-canning cherry tomatoes maximizes the natural flavor and texture of the tomatoes, creating a delicious and vibrant canned product. Additionally, the precise combination of processing time, pressure, and headspace ensures optimal safety and long-term preservation.
Ingredients
Scale
- 7 pounds cherry tomatoes (about 16 cups)
- 4½ cups water
- 8 tablespoons lemon juice
- Kosher salt or canning salt
- Add herbs or spices
- Olive oil (optional)
- Garlic cloves (if desired)
Instructions
- Before you begin pressure canning, gather all the necessary supplies. This includes a pressure canner, canning jars with lids and bands, a jar lifter, a lid lifter or magnet, a sharp knife, a cutting board, a slotted spoon, and a clean kitchen towel.
- Wash the canning jars, lids, and bands with hot soapy water. Rinse them well. Sterilize the jars by boiling them in a large pot of water for 10 minutes or running them through a dishwasher cycle. Keep them submerged in hot water until ready to use.
- Refer to the manufacturer’s instructions for your specific pressure canner model. Ensure that the pressure canner is clean and in proper working condition. Place the canning rack inside the canner and add 2-4 inches of water.
- Heat the lids over low heat, but not bring them to a boil. This helps soften the sealing compound on the lids. Keep the bands handy.
- Rinse your tomatoes in a strainer and prepare them as desired.
- Cook the tomatoes in a large pot with 1½ cups of water. Let them boil on high heat for 5 minutes before putting them into the jars. Some people like to fry the tomatoes with a little olive oil, garlic, and salt rather than boiling them.
- Use a ladle and a canning funnel to transfer the cooked cherry tomatoes and their juices into the jars. Otherwise, place them directly into the jar, packing them firmly without squashing them. Leave a one-inch headspace.
- Use 1 tablespoon of lemon juice for every pint jar or 2 tablespoons for each quart jar.
- Add enough boiling water to cover the tomatoes. Your final headspace should be between ½ and ¾ inches.
- Use a spatula, wooden spoon, or other soft kitchen implement to remove any air bubbles that have formed on the inside of the jar.
- Wipe any residue from the rims of the jars using a damp dish towel dipped in vinegar. Attach the lids and bands to the jars, tightening them until “fingertip tight.”
- Add two inches of water to the pressure canner.
- Using a jar lifter or tongs, put the jars into the canner. Lock the lid on tight, and increase the heat. Allow the canner to come to a boil.
- Process pints for 15 minutes and quarts for 10 minutes per your altitude and canner type:
Dial Gauge Pressure Canner
- 0 – 2,000ft: 6 lbs for pints; 11 lbs for quarts
- 2,001 – 4,000ft: 7 lbs for pints; 12 lbs for quarts
- 4,001 – 6,000ft: 8 lbs for pints; 13 lbs for quarts
- 6,001ft and up: 9 lbs for pints; 14 lbs for quarts
Weighted Gauge Pressure Canner
- 0 – 1,000ft: 5 lbs for pints; 10 lbs for quarts
- 1,001ft and up: 10 lbs for pints; 15 lbs for quarts
Post Processing
- When the processing time is complete, turn off the stovetop and let the pressure release naturally.
- Once the dial gauge reads zero, remove the pressure regulator and release any remaining pressure.
- Open the lid and use tongs or a jar lifter to transfer the jars carefully to a clean dish towel or a protected work surface. Let the jars cool undisturbed for 12 to 24 hours.
- Test the seals by gently pressing the center of the lids with your thumbs. If they flex or move, it indicates an improper seal.
- Prep Time: 20 minutes
- Canning Time: 15 minutes
- Cook Time: 40 minutes
Nutrition
- Serving Size: 17g
- Calories: 3.1kcal
- Sugar: 0.5g
- Sodium: 0.9mg
- Fat: 0g
- Carbohydrates: 0.7g
- Fiber: 0.2g
- Protein: 0.2g